Ointments, salves and balms, part 2
Making balms, From The Handmade Apothecary book (C) Kyle Books 2017.
<For part 1, the introduction to making ointments, click here.
Below is a basic recipe, advice on essential oils and troubleshooting tips.
Vegan options and recipes using butters can be found on the next page.
What equipment will you need?
small scales - It is really worth investing in small electric scales that can measure tiny quantities under 5g. This allows you to get the right oil to beeswax ratio.
Bain-Marie, or make your own using a heat-proof dish suspended over a pan of gently simmering water)
Measuring jug
Herbal infused oil
Beeswax - This is a hard wax that will set the oil
Essential oils (optional)
Vitamin E oil (optional)
Clean glass jars and lids. Squat, wide mouthed jars are best as they are easier to get the ointment in and out.
Kitchen towel for spills
OIL TO BEESWAX RATIOS FOR BASIC OINTMENTS
1 x level 5ml measuring spoon is holds roughly 2.5g-3g beeswax pellets. It is really worth buying scales that can measure in single or half grams.
- 15g beeswax : 100ml oil = soft ointment
- 20g beeswax : 100ml oil = medium-firm ointment
- 25g beeswax : 100ml oil = firm ointment e.g getting toward lip balms, solid bars
Also note, the extra beeswax makes the ointment less sticky: The more beeswax, the ‘drier’ and easier the ointment is to rub in. The less beeswax, the ‘oiler’ it feels.
These measures are accurate for temperate climates. If you live in a warmer country, you may need to add a little extra beeswax, or store in the fridge.
Vegan alternatives: A discussion on vegan alternatives can be found on next page but you can replace beeswax with half the amount of candelilla (e.g. 20 g beeswax = 10g candelilla wax)
Top tip: To test the consistency of your balm, keep a small plate in the freezer while you make it. When your oil and wax has melted and been blended, add a drop to the cold plate to see how it sets. If it sets too hard, add a little extra oil to the mix. Too soft? add a sprinkle more beeswax.
- Write down the quantites so you can repeat the recipe next time.
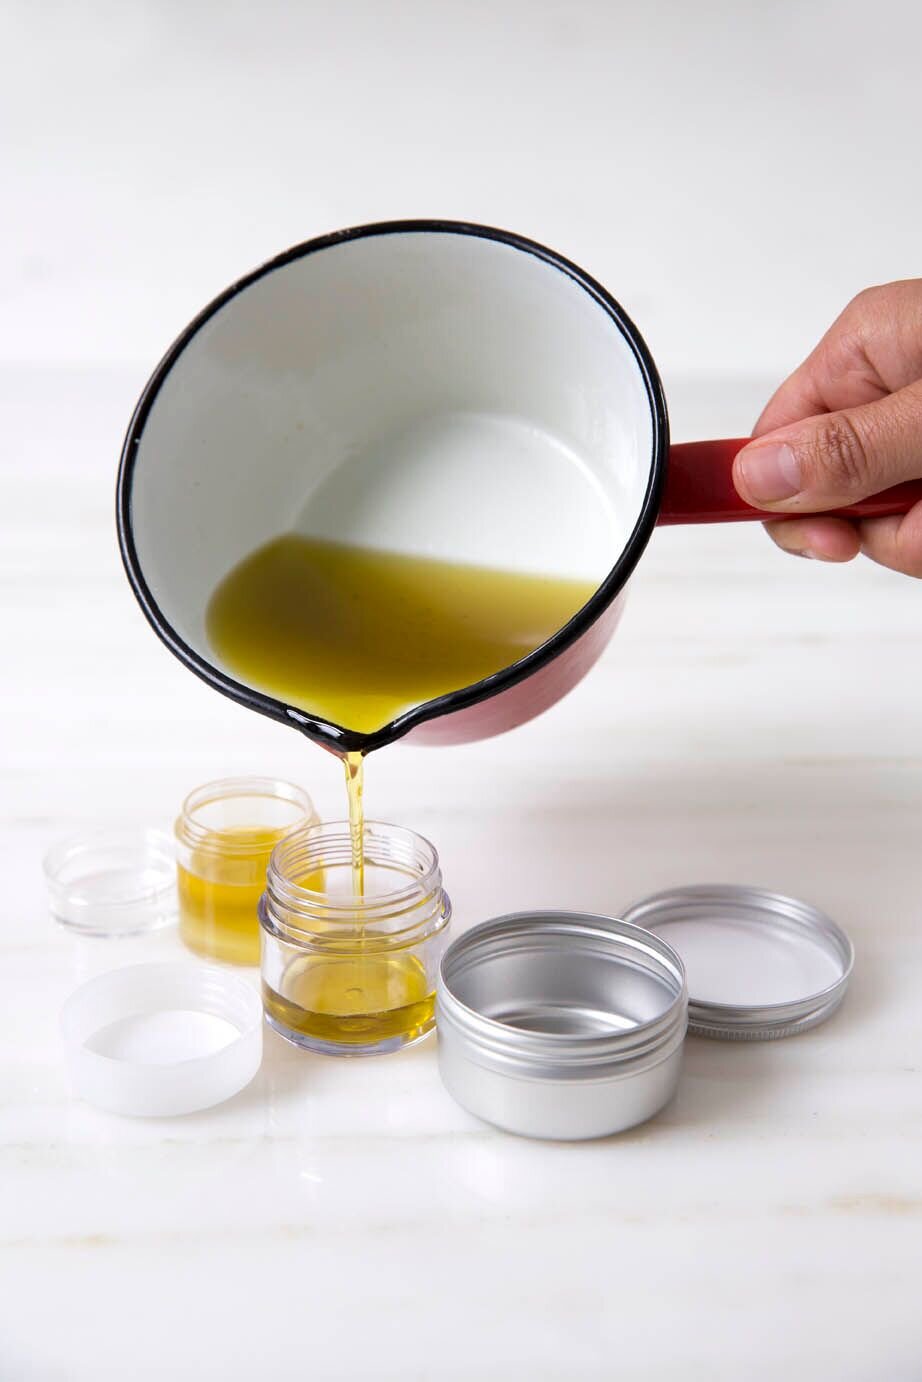
Method 1: Basic ointment
Choose the ratio of herbal infused oil to beeswax as noted in the above box.
Gently heat the oil and beeswax together over a bain-marie (or a pouring jug nestled in a pan of gently heating water).
Allow to melt and stir until melted and well combined.
(Optional)Essential oil addition : remove from heat and allow to cool a little, then add essential oils (see box below for ratios).
Pour into glass jars, and leave to set with the lid off.
After the balm has set, place on the lid, label and date the jars.
Store in a cool dry place.
Extra hints: Adding 1% vitamin E oil when ready to decant will help preserve your ointment from oxidation (going rancid). Vitamin E also nourishes the skin.
So, for 100 ml ointment, add 1 ml Vitamin E oil.
Adding essential oils to balms
Essential oils can be added for scent, for therapeutic use and to extend ointment shelf life.
The ratio of essential oils to ointments is 2%-3%
If you have sensitive skin, try 1%, especially for use on face.
20 drops of essential oil = 1 ml
Therefore, for every 10 ml of ointment, you can add 2-3 drops of essential oil.
For 100 ml of ointment, you can add 20-30 drops of essential oil.
METHOD: After removing the mixture from heat, allow it to cool a little before mixing in the essential oils with a thin metal stirrer. Otherwise, they will evaporate quickly in the heat.

Discover more foraging tips and herbal recipes in our best-selling book.
Troubleshooting
My set ointment has a dip/crack on the top, how do i stop that?
Balms sometimes do that. We don’t find it a problem, but after it sets, you could add a little more melted balm to the top to even it out. What happens is that the centre cools more slowly than the edges and causes the top to ‘fall in’. Therefore, try to use smaller jars or ones that are shallower (wider than they are tall). These allow the cooling process to be more ‘even’. You can also try to slow down the cooling process further to make it more even by letting the balm cool down in a warmer place, e.g by an oven or radiator.
My ointment has swirls on the top
This might be because you didn’t allow the beeswax and oil to melt and mix properly. Try melting it and mixing it well before resetting.
My ointment is grainy/has lots of tiny crystals in it
Did you use a vegetable butter? Shea commonly does this. Though the ‘crystals’ will still melt on the body and don’t affect the properties of the balm, it can ruin the feel. If this has happened, reheat the balm and set once again. To prevent it in future, heat the vegetable butter, allow it to set and then reheat again to make your balm before adding essential oils. It also helps to cool butter-based ointments as quickly as possible, so set in the fridge.
My ointment has condensation on the top
You can pat these off with a clean piece of kitchen paper. To prevent this in future, don’t put the lid on the hot ointment before it sets. This causes water droplets to form.
My ointment has mould on top/in the lid
See point above about not adding the lid to a hot ointment. The condensation can encourage mould growth. Discard the balm.
My ointment is too hard/soft
TOP TIP: while making your ointment, keep a plate in the freezer. When your ointment is ready, place a drop on the plate and see how it sets. Too soft? Add more beeswax. Too hard? add more oil. If you have already jarred up your ointments, remelt the whole lot and start again. It is fine, we have all done it.